Oodles of Doodles News wants you to know one thing: I get you. I know you like to mix your fiber art with paint, or doodle and collage in journals, or collect found objects you know you’ll find a use for “someday.” Your art can’t always be defined. It’s out of the box and outside the lines. Other people may not get it, but I do -- and my hope is that these oodles of newsy articles will enhance and inspire what you do! Has your style evolved since you began stamping, papercrafting, gone artsy? Do you have a signature color, motif, or technique? Leave a comment below!
Embossing powders are a gateway into mixed-media art. Any substance that seems to magically change, and watching the powder-coated stamped imprint turn into a shiny raised image after heating will just wow you. About the time I began DZ Doodles Digital Stamps, Tim Holtz' line of Distress products was taking off. I loved the vintage, grungy look you could achieve with his supplies, and I stocked up on the faded ink colors and rusty-crusty embossing powders with names like Faded Jeans and Worn Lipstick.
It's easy to learn how to emboss. All you need is cardstock, pigment ink, embossing powder, a stamp, and embossing tool or heat gun.
1. Ink up your stamp with the pigment ink. You can use clear ink specially made for embossing, but you can also use colored ink.
2. Stamp your cardstock or tag.
3. Open the jar of embossing powder and tap the crystals out onto the inked image. Tap off the excess powder onto another piece of paper or a manila folder.
Here are some tips and safety precautions to be aware of when using embossing powders:
Technique tips:
- Be sure to use pigment ink. They stay wet longer than dye inks enabling the powder to stick to them.
- Choose your embossed finish to suit your project. Embossing powders come in enamel (shiny), matte, and other finishes. For example, Tim Holtz' DistressTM embossing powders don't melt as much as regular powders. Instead they result in a granular patina that appears rusty and aged, depending on the color you choose.
- Work over a piece of unfolded cardstock (an old manila file folder is perfect for this). After tapping excess powder on the cardstock, bring the two sides of the unfolded paper into a V and pour the extra powder back into the jar. If you are working with more than one color of powder at a time, have a folder for each one.
- After covering the inked image with the embossing powder, turn the paper over and tap on the back. This will help the excess powder to drop off the paper rather than stick to it if you just tip the paper to the side.
- To remove flecks of embossing powder that have gone astray (before using the heat), use a soft, small paintbrush.
- Before opening the jar of powder, don a disposable surgical mask so you don't inhale the granules.
- Work in a well-ventilated area, preferably while wearing a respirator, during the heat gun phase of the project as the heated embossing powders will emit fumes.
- That heat gun? It gets hot. Direct it away from you and not too close to your artwork. Make sure you have a safe, sturdy spot to set it down when not actively using it (like a fire-proof table or an upturned terra cotta flower pot), and turn it off between blasts. Always unplug it before leaving the room, even for a few moments.
 Canopy Crafts, by Nance Lempinen-Leddy, made her own edgelit ... fussy-cut the edge. An awesome idea! She began by stamping a border of images along the cards front opening edge, in a color combo. Then trimmed the card edge, following the stamped images outer edge shapes to create a super cool effect. Now I know what to do with all those floral stamps that I love to collect, but just haven't found very many excuses to use them as much as I'd like to! :0)
Deedee's Tuesday Tutorial - DIGIS 101: Instead of sharing a project, Clearly I Stamp is sharing a great tutorial explaining the basics of digis and by the end of the tutorial you should have a strong grasp on what digis are, and be able to get started using them. Included is a zip utility program download if you haven't one, and 60 day trial offer for Microsoft Office 2010 to download which includes Word as well - so that you can follow the resizing and printing tutorial using Microsoft Office!
Twelve EASY IMAGE TRANSFER METHODS consolidated in one place so you'll easily find the method that you want to use for your particular project. You will find 12 different ways to transfer onto pretty much any type of material; some are The Graphic Fairy DIY Projects Tutorials, some are from readers and a couple were found online.
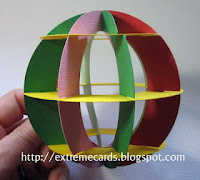
 The GLOBE SLICEFORM Tutorial at Extreme Card and Papercrafts is a unique design idea that would work well for Christmas ornaments ... one thing that I thought of when I first saw this. Get your Globe Sliceform download template as a PDF, or SVG1 and SVG2 and cut out pieces!
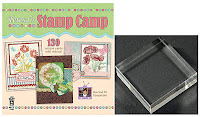
 Paper Wishes Webisode's introduces Teresa's Stamp Camp #1 DVD - 20 Chapters with 130 unique cards! Includes several marbling techniques using Pergammo Paper and card stock, water and blending solution: Smooch Inks, chalk sets, and Spectrum Noir Pens. Also, Stamped image stamp dimensional layers and lots more!
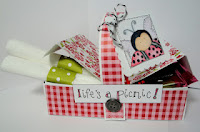
 What a cute summertime project to gift-give cookies or candies -- Inky Antics "Life's a Picnic" Basket. And Inky Antics Easter project "Bunnies in a Basket" too!
In
this free eBook you will get tips from four experts on a variety of collage
techniques for creating mixed media collages using fabric, paint, stitch, found
objects, handmade paper, and more. Each artist reveals how careful planning and
spontaneity combine to inspire you to create collages that are truly unique
works of art. Take your collage art to new creative heights with the tools and
collage techniques in this FREE eBook!
Get Four Articles Full of Incredible Mixed Media Collage Techniques and enter the world of collage/mixed media art! Download your FREE eBook to get started today! Collage-in-Color-PC-eMag.

DIGI HAVEN is a Challenge Blog for those
who love Free Digital Images (also known as "freebies") and is
dedicated to thanking all the Wonderful Artists out there who Generously
Share their Talents with you! And to help you compete, I'll be
listing "freebies" that you'll enjoy using to acquire your "Winners Button" to
proudly display on your site! Credit me, please, if you post online -
and drop me a link ... thanks!


1 comment:
There is always such amazing stuff here. Thanks for all the ideas and links and most of all, the snowman images!
Post a Comment